Showing posts with label chicken. Show all posts

Monday, February 13, 2017

Pozole Verde de Pollo (Green Mexican Hominy and Chicken Soup) Recipe

If you've ever cooked that great Rick Bayless recipe for pozole verde, the Mexican meat and hominy soup flavored with green chilies and tomatillos, you'd know that it's a beast. The truth is, unless you've got the day off, cooking pozole on a Thursday is nothing more than a sueño imposible. My goal was to come up with a recipe that is not only delicious, but fast enough that it can reasonably be made on a Thursday night. The recipe I came up with may or may not be authentic, but it sure as heck is delicious.
WHY IT WORK 
Streamlining multi-day, multi-pot traditional pozole recipes into a single Dutch oven makes this recipe doable on a weeknight.
Searing the green salsa adds depth to its flavor.
Pumpkin seeds add nutty flavor and a creamy texture.
SPECIAL EQUIPMENT:
Dutch oven, blender
NOTES:
You can use dried hominy in place of canned. Soak dried hominy in water overnight. Drain and cook in fresh water at a gentle simmer until tender, about 1 1/2 hours. Drain and use as directed. 
INGREDIENTS
For the Soup:
3 ounces pumpkin seeds (85g; about 1/2 cup)
2 1/2 pounds bone-in chicken leg quarters (1.2kg; about 3 leg quarters)
1 pound tomatillos (450g)
1 large white onion, roughly chopped
1 jalapeño pepper, stems and seeds removed, roughly chopped
1 poblano pepper, stems and seeds removed, roughly chopped
1 Anaheim pepper, stems and seeds removed, roughly chopped
6 cups homemade or store-bought low-sodium chicken stock (1.5 liters)
2 tablespoons dried oregano, preferably Mexican (about 8g)
2 sprigs epazote (optional)
Salt
Handful fresh cilantro leaves and fine stems
1 (28-ounce; 800g) can white hominy, drained (see note)
To Serve:
Diced avocado
Diced radishes
Thinly sliced serrano or jalapeño peppers
Chopped fresh cilantro leaves
Finely chopped white onion
DIRECTIONS
1.
For the Soup: Heat pumpkin seeds in the base of a large Dutch oven over medium-high heat, stirring constantly, until they start to pop and smell nutty, about 4 minutes. Transfer pumpkin seeds to a bowl and set aside.

2.
Add chicken, tomatillos, onion, peppers, chicken stock, oregano, epazote (if using), and a large pinch of salt to the Dutch oven. Bring to a boil over high heat then reduce to a bare simmer. Cook, stirring occasionally, until chicken and vegetables are completely tender, about 40 minutes.

3.
Using tongs, transfer chicken to a large plate or bowl and set aside. Discard epazote sprigs (if using). Set a large fine mesh strainer over a large bowl and strain the broth through it. Transfer solids to the jar of a blender. Add pumpkin seeds and cilantro to the blender. Blend on high speed until smooth. Set aside.

4.
Using a ladle, carefully skim off a few tablespoons of fat from the strained stock and add it to the Dutch oven (it's okay if a little stock gets in as well). Heat over high heat, swirling and stirring until the watery stock completely evaporates and starts to form a browned layer in the bottom of the pan. (It will spatter a bit. The more you stir, the less it will spatter.) As soon as the chicken fat starts to smoke, pour in the contents of the blender all at once and cook, stirring, for about 15 seconds (it will spatter a lot—wear an apron!). Immediately pour in strained chicken stock and fat and stir to combine. Bring to a bare simmer, stir in hominy, season to taste with salt, and keep warm.

5.
By this stage, the chicken should be cool enough to handle. Discard the skin and bones and shred the meat into bite-sized pieces with your fingertips. Stir the picked chicken back into the soup.

6.
To Serve: Ladle the hot soup into bowls and garnish with diced avocado and radish, sliced chilies, chopped cilantro, and chopped white onion. Serve immediately.

Read More

Tuesday, February 7, 2017

Chicken Piccata (Fried Chicken Cutlets With Lemon-Butter Pan Sauce) Recipe

Chicken piccata takes a beloved food—pan-fried chicken cutlets—and tops it with a simple but luxurious lemon-butter pan sauce. The result is a flavor and texture festival that blends crispness, juiciness, richness, and tartness all into one.

WHY IT WORKS

Fried chicken cutlets topped with a rich butter sauce.
Japanese panko bread crumbs form a coating that becomes shatteringly crisp but still light and tender, not dense and tough.
The pan sauce whips up quickly after frying, so the cutlets don't have to wait long.
SPECIAL EQUIPMENT:
Large skillet
INGREDIENTS
1 cup all-purpose flour (5 ounces; 140g)
3 large eggs, beaten
2 cups panko bread crumbs (4 ounces; 115g), roughly crushed by hand if very large
2 ounces (60g) grated Parmigiano-Reggiano cheese
8 boneless, skinless chicken cutlets (3 or 4 ounces each), pounded to about 1/4 inch thick
Kosher salt and freshly ground black pepper
Vegetable oil, for frying
1/2 cup dry white wine (120ml)
1 1/2 tablespoons drained capers (15g)
5 tablespoons unsalted butter (70g)
2 tablespoons fresh juice from 1 lemon (30ml)
1 1/2 tablespoons minced flat-leaf parsley
DIRECTIONS
1.
Set three wide, shallow bowls on a work surface. Add flour to the first one, beaten eggs to the second, and panko and Parmesan cheese to the third. Mix panko and Parmesan thoroughly.

2.
Line a rimmed baking dish with parchment paper. Season chicken cutlets all over with salt and pepper. Working with one at a time, dredge a cutlet in flour with your left hand, shaking off excess. Transfer to egg dish, then turn cutlet with your right hand to coat both sides. Lift and allow excess egg to drain off, then transfer to bread crumb mixture. With your left hand, scoop bread crumbs on top of chicken, then gently press, turning chicken to ensure a good layer of crumbs on both sides. Transfer cutlet to prepared baking sheet and repeat with remaining cutlets.

3.
Fill a large skillet with 1/4 inch oil. Heat over high heat until shimmering and just shy of smoking, about 375°F on an instant-read thermometer.

4.
Working in batches and using tongs or your fingers, gently lower cutlets into the pan, laying them down away from you to prevent hot fat from splashing toward you. Fry, gently swirling pan and rotating cutlets for even browning, and adjusting heat as necessary for a steady, vigorous bubble, until bottom side is browned and crisp, about three minutes. Flip cutlets and fry until other side is browned and crisp, about three minutes longer. Transfer to paper towels to drain and season with salt right away. Repeat with remaining cutlets, topping up oil if necessary.

5.
Drain all but one tablespoon oil from skillet. Add wine and bring to a boil over medium-high heat, cooking until raw alcohol smell has mostly cooked off, about two minutes. Add capers and butter, whisking constantly, until butter has melted. Lower heat to medium and continue whisking and reducing until a creamy, emulsified sauce forms (the time this takes will depend on your burner power and the size of your pan). If sauce over-reduces and breaks at any point, add one tablespoon cold water and whisk to emulsify it again. Whisk in lemon juice and parsley, season with salt and pepper, and remove from heat.

6.
Arrange cutlets on a platter and drizzle warm butter sauce all over. Serve right away.
Read More

Friday, January 13, 2017

Easy Creamy Chicken Enchilada Soup Recipe

      
This chicken enchilada soup features a rich and creamy broth, plenty of melted cheese, and the spicy, toasty flavor of chilies. Little nubs of sweet corn and black beans fill each spoonful, along with tender bits of shredded chicken. It's like drinking deliciously inauthentic liquid enchiladas—what more could you want on a cold night?

WHY IT WORKS 
Gently poaching the chicken just until it's done ensures tender, moist meat, while also adding flavor to the broth.
Instead of a can of enchilada sauce, our recipe starts with real dried chilies, toasted in the microwave for more complex, robust flavor.
Cream cheese gives the soup a rich texture and flavor.
SPECIAL EQUIPMENT:
Instant-read thermometer, blender
NOTES:
For an easier version, use 1 cup (250 milliliters) canned red enchilada sauce in place of the chilies and vinegar. You can use two fresh Hatch, Anaheim, or poblano peppers in place of the can of chopped green chilies. Roast the peppers in a foil-lined rimmed baking sheet under a broiler preheated to high, turning the chilies occasionally, until they're charred on all sides, about 10 minutes total. Wrap them tightly in foil and let them rest for 5 minutes. Peel the chilies, discard stems and seeds, and chop.
INGREDIENTS
2 whole dried guajillo chilies, stems and seeds removed (see note above)
2 whole dried ancho chilies, stems and seeds removed (see note above)
1 1/2 quarts (1.5 liters) homemade or store-bought low-sodium chicken stock
1 split bone-in, skin-on chicken breast (about 1 pound; 450 grams)
4 ounces (100 grams) cream cheese
1 tablespoon (15 milliliters) distilled white vinegar (see note above)
1 tablespoon (15 milliliters) vegetable or canola oil
1 medium yellow onion, finely diced (about 1 cup; 1/2 pound; 200 grams)
Kosher salt and freshly ground black pepper
3 medium cloves garlic, minced (about 1 tablespoon; 10 grams)
2 ears of corn, kernels removed (about 1 1/2 cups; 250 grams)
1 (14-ounce; 400-milliliter) can diced tomatoes
1 (4.5-ounce; 125-milliliter) can chopped green chilies (see note above)
1 (14.5-ounce; 400-gram) can black beans, drained and rinsed
1/2 pound (225 grams) grated pepper jack cheese
1 tablespoon (15 milliliters) fresh juice from 1 lime
1/2 cup picked fresh cilantro leaves (about 1 ounce; 30 grams), chopped
Diced avocado, picked fresh cilantro leaves, sliced scallions, and grated cheese, for serving
DIRECTIONS
1.
Place guajillo and ancho chilies on a microwave-safe plate and microwave on high at 15-second intervals until hot, pliable, and toasted-smelling, about 30 seconds total. Combine chicken stock, split chicken breast, and toasted chilies in a medium pot. Bring to a boil, reduce to lowest heat setting, cover, and cook until chicken breast is cooked through (an instant-read thermometer inserted into the center of the breast should register 155 to 160°F) and chilies are tender, about 15 minutes.

2.
Remove chicken breast to a plate and set aside to cool. Transfer chilies to the jar of a blender and add 1 cup of stock. Blend, starting at lowest speed and gradually increasing to high speed, until chilies are completely puréed, about 2 minutes. Add cream cheese and blend until homogeneous, about 1 minute, adding more stock as necessary if the mixture is too thick. Whisk chili/cream cheese mixture back into remaining chicken stock. Whisk in vinegar and set aside.

3.
When chicken is cool enough to handle, shred meat into bite-sized pieces using your fingers or two forks. Set aside. Discard skin and bones.

4.
Heat oil in a large saucepan over medium heat until shimmering. Add onion, season with salt and pepper, and cook, stirring, until softened but not browned, about 5 minutes. Add garlic and cook, stirring, until fragrant, about 30 seconds.

5.
Add corn and cook, stirring, until heated through, about 3 minutes. Add tomatoes, chopped green chilies, black beans, and stock/chili/cream cheese mixture. Bring to a simmer over medium heat, stirring frequently. Stir in pepper jack cheese, shredded chicken, and lime juice. Season to taste with more salt and pepper. Stir in cilantro. Serve immediately with diced avocado, picked fresh cilantro leaves, sliced scallions, and grated cheese.

Read More

Sous Vide Chicken Breast Recipe

Sous-vide techniques will give you chicken with unparalleled levels of juiciness.
WHY IT WORKS
Cooking chicken sous vide allows for unparalleled control over cooking temperature and, therefore, level of juiciness.
Following precise temperature and time charts gives you the ability to get exactly the result you want.
Instructions for finishing the chicken in the pan or on the grill offer maximum flexibility on browning and crisping the chicken before serving.
SPECIAL EQUIPMENT:
Sous-vide precision cooker, such as the Anova Precision Cooker
NOTES:
Sous-Vide Chicken Breast Temperature and Timing Chart 
Texture Temperature                                                     Timing Range   
Tender and juicy for cold chicken salad                       150°F (66°C) 1 to 4 hours
Very soft and juicy, served hot                                      140°F (60°C) 1 1/2 to 4 hours 
Juicy, tender, and slightly stringy, served hot                   150°F (66°C) 1 to 4 hours
Traditional, juicy, firm, and slightly stringy, served hot      160°F (71°C) 1 to 4 hours
INGREDIENTS
2 bone-in, skin-on chicken breast halves
Kosher salt and freshly ground black pepper
4 sprigs thyme or rosemary (optional)
DIRECTIONS
1.
Preheat a water bath to desired final temperature using a sous-vide cooker, according to the chart above. Season chicken generously with salt and pepper. Place chicken in zipper-lock bags or vacuum bags and add thyme or rosemary sprigs, if using.

2.
If Using Zipper-Lock Bags: Remove air from zipper-lock bags by closing the bags, leaving the last inch of the top unsealed. Slowly lower into the preheated water bath, sealing the bag completely just before it fully submerges. Cook according to the chart above.

3.
If Using Vacuum Bags: Seal according to manufacturer's instructions. Add bagged chicken to preheated water bath and cook according to the chart above.

4.
To Finish in a Pan: Turn on your vents and open your windows. Remove chicken from water bath and bag. Discard herbs, if using. Carefully pat chicken dry with paper towels. Heat the oil in a heavy cast iron or stainless steel skillet over medium-high heat until shimmering. Gently lay the chicken in the skillet, skin side down, using your fingers or a set of tongs. Hold the chicken down flat in the pan with a flexible metal spatula or your fingers (be careful of splattering oil). Cook until golden brown and crisp, about 2 minutes. Remove from pan and let rest until cool enough to handle, about 2 minutes. Remove bones with your fingertips. Slice chicken and serve.

5.
To Finish on the Grill: Light one half chimney full of charcoal. When all the charcoal is lit and covered with gray ash, pour out and arrange the coals on one side of the charcoal grate. Set cooking grate in place, cover grill, and allow to preheat for 5 minutes. Alternatively, set half the burners on a gas grill to medium-high heat setting, cover, and preheat for 10 minutes. Clean and oil the grilling grate. Remove chicken from water bath and bag. Discard herbs, if using. Carefully pat chicken dry with paper towels. Gently lay the chicken on the hot side of the grill, skin side down. Cook until nicely marked, about 2 minutes. Rotate 90 degrees and cook until chicken is marked again and skin is crisp, about 1 1/2 minutes longer. Remove from grill and let rest until cool enough to handle, about 2 minutes. Remove bones with your fingertips. Slice chicken and serve.

Read More

The Food Lab's Southern Fried Chicken Recipe

For me, as a kid growing up in New York, fried chicken came from one place, and one place only: those grease-stained cardboard buckets peddled by the Colonel himself. But times have changed, and as is often the case, revisiting those fond childhood memories results only in disappointment and disillusionment. That said, stylistically, it can't be faulted. So I figured that I could somehow manage to take what the Colonel started and bring it to its ultimate conclusion—that is, deep chicken flavor; a flab-free skin; juicy, tender meat; and crisp, spicy coating—I might just be able to recapture those first fleeting childhood tastes of fried chicken as I remembered them. Here's the result of my efforts.
WHY IT WORKS
An intensely flavored buttermilk brine tenderizes the chicken while keeping it moist.
Adding wet ingredients to the dry flour coating ensures an extra-craggy crust with lots of nooks and crannies.
Starting in hot fat and finishing in the oven gives you fried chicken with a crisp crust and evenly cooked meat.
SPECIAL EQUIPMENT:
Wok or chicken fryer
INGREDIENTS
2 tablespoons paprika
2 tablespoons freshly ground black pepper
2 teaspoons garlic powder
2 teaspoons dried oregano
1/2 teaspoon cayenne pepper
1 cup buttermilk
1 large egg
Kosher salt
One whole chicken, about 4 pounds, cut into 10 pieces or 3 1/2 pounds bone-in, skin-on breasts, legs, drumsticks, and/or wings
1 1⁄2 cups all-purpose flour
1⁄2 cup cornstarch
1 teaspoon baking powder
4 cups vegetable shortening or peanut oil
DIRECTIONS
1.
Combine the paprika, black pepper, garlic powder, oregano, and cayenne in a small bowl and mix thoroughly with a fork.

2.
Whisk the buttermilk, egg, 1 tablespoon salt, and 2 tablespoons of the spice mixture in a large bowl. Add the chicken pieces and toss and turn to coat. Transfer the contents of the bowl to a gallon-sized zipper-lock freezer bag and refrigerate for at least 4 hours, and up to overnight, flipping the bag occasionally to redistribute the contents and coat the chicken evenly.

3.
Whisk together the flour, cornstarch, baking powder, 2 teaspoons salt, and the remaining spice mixture in a large bowl. Add 3 tablespoons of the marinade from the zipper-lock bag and work it into the flour with your fingertips. Remove one piece of chicken from the bag, allowing excess buttermilk to drip off, drop the chicken into the flour mixture, and toss to coat. Continue adding chicken pieces to the flour mixture one at a time until they are all in the bowl. Toss the chicken until every piece is thoroughly coated, pressing with your hands to get the flour to adhere in a thick layer.

4.
Adjust an oven rack to the middle position and preheat the oven to 350°F. Heat the shortening or oil to 425°F in a 12-inch straight-sided cast-iron chicken fryer or a large wok over medium-high heat. Adjust the heat as necessary to maintain the temperature, being careful not to let the fat get any hotter.

5.
One piece at a time, transfer the coated chicken to a fine-mesh strainer and shake to remove excess flour. Transfer to a wire rack set on a rimmed baking sheet. Once all the chicken pieces are coated, place skin side down in the pan. The temperature should drop to 300°F; adjust the heat to maintain the temperature at 300°F for the duration of the cooking. Fry the chicken until it’s a deep golden brown on the first side, about 6 minutes; do not move the chicken or start checking for doneness until it has fried for at least 3 minutes, or you may knock off the coating. Care- fully flip the chicken pieces with tongs and cook until the second side is golden brown, about 4 minutes longer.

6.
Transfer the chicken to a clean wire rack set on a rimmed baking sheet and place in the oven. Cook until an instant-read thermometer inserted into the thickest part of the breast registers 150°F and the legs register 165°F, 5 to 10 minutes; remove the chicken pieces to a second rack or a paper-towel-lined plate as they reach their final temperature. Season with salt and serve—or, for extra-crunchy fried chicken, go to step 7.

7.
Place the plate of cooked chicken in the refrigerator for at least 1 hour, and up to overnight. When ready to serve, reheat the oil to 400°F. Add the chicken pieces and cook, flipping them once halfway through cooking, until completely crisp, about 5 minutes. Transfer to a wire rack set on a rimmed baking sheet to drain, then serve immediately.

Read More

5-Minute Grilled Chicken Cutlets With Rosemary, Garlic, and Lemon Recipe

Even I have days in which I've spent far too long in front of a computer screen and realize that I only have half an hour before my wife gets home and it's dinnertime. This right here is the easiest, most foolproof way I know to get a hot grilled chicken dinner on the table in record time. Not only that, but it packs in more flavor than most all-day recipes.
                                                           WHY IT WORKS
A quick marinade performs double duty as a finishing sauce.
Cutting the chicken into cutlets makes for record-fast cooking time.

Cooking the chicken almost all the way through on one side develops plenty of browned flavor while maintaining juiciness.
SPECIAL EQUIPMENT:
Grill
INGREDIENTS
3 medium cloves garlic, minced (about 1 tablespoon)
3 tablespoons minced fresh rosemary
2 tablespoons fresh juice from 2 lemons
6 tablespoons extra-virgin olive oil
Kosher salt and freshly ground black pepper
4 boneless, skinless chicken breasts (5 to 7 ounces each), cut into 8 cutlets
DIRECTIONS
1.
Light one chimney full of charcoal. When all the charcoal is lit and covered with gray ash, pour out and arrange the coals on one side of the charcoal grate. Set cooking grate in place, cover grill and allow to preheat for 5 minutes. Alternatively, set half the burners on a gas grill to the highest heat setting, cover, and preheat for 10 minutes. Clean and oil the grilling grate.

2.
Whisk together garlic, rosemary, lemon juice, and olive oil in a large bowl. Season to taste with salt and pepper. Transfer half of mixture to a separate container and set aside. Add chicken to the large bowl and turn pieces to thoroughly coat.

3.
Place chicken directly over the hot side of the grill, cover, and cook, rotating the pieces occasionally (but not flipping them), until the chicken is almost completely cooked through and only a few pink spots remain on the top side, about 4 minutes. Flip chicken and cook on second side until just done, about 30 seconds. Transfer to a serving platter. Re-whisk reserved marinade and pour it over the chicken. Serve immediately.
Read More

Japanese Chicken Skewers With Scallion (Negima Yakitori) Recipe


For my money, the easiest and most forgiving yakitori staple is negima: juicy chicken thigh alternately threaded onto a skewer with sections of scallion. Because thighs are naturally high in connective tissue and fat, they end up juicy even if you don't precisely measure temperature as they cook.
WHY IT WORKS
Chicken thighs are loaded with connective tissue and fat, making them perfectly juicy and tender even without a thermometer.
Moderate heat and a sweet and savory glaze give these skewers intense flavor.
SPECIAL EQUIPMENT:
Grill, skewers

NOTES:
I strongly suggest making your own teriyaki sauce instead of using store-bought; it will taste much better. For an even more flavorful sauce, try adding a few smashed garlic cloves, slices of ginger, and roughly chopped scallions to the saucepan as the sauce reduces.
INGREDIENTS
2 pounds (1kg) boneless, skinless chicken thighs, cut into 1-inch dice
Kosher salt and freshly ground white or black pepper
1 bunch scallions, cut into 1-inch pieces
1/2 cup (120ml) teriyaki sauce(see note above)
DIRECTIONS
1.
In a large bowl, toss chicken pieces with 2 teaspoons kosher salt and a few grinds of pepper. Thread 2 to 3 pieces of chicken onto a skewer (enough to add up to around 1/2 to 3/4 inch when pressed tightly together), then thread a segment of scallion onto skewer. Continue alternating every few pieces of chicken with scallion until chicken and scallions are used up, using as many skewers as necessary. Make sure all the meat and scallions are tightly packed.

2.
Light 2/3 chimney full of charcoal. When all the charcoal is lit and covered with gray ash, pour out and arrange the coals on one side of the charcoal grate. Set cooking grate in place, cover grill, and allow to preheat for 5 minutes. Alternatively, set half the burners on a gas grill to the medium-high heat setting, cover, and preheat for 10 minutes. Clean and oil the grilling grate.

3.
Place chicken skewers directly over the hot portion of the grill, cover, and cook, turning frequently, until chicken is well browned, scallions are tender, and a piece of chicken looks cooked when removed and cut in half with a knife, about 10 minutes. Season with additional salt and pepper 2 to 3 times during the cooking process.

4.
Brush chicken and scallions with teriyaki glaze and cook for 30 seconds. Turn, brush second side with teriyaki, and cook for 30 seconds longer. Remove chicken from grill and allow to rest for 1 to 2 minutes. Brush with additional glaze and serve immediately.

Read More

Wednesday, January 11, 2017

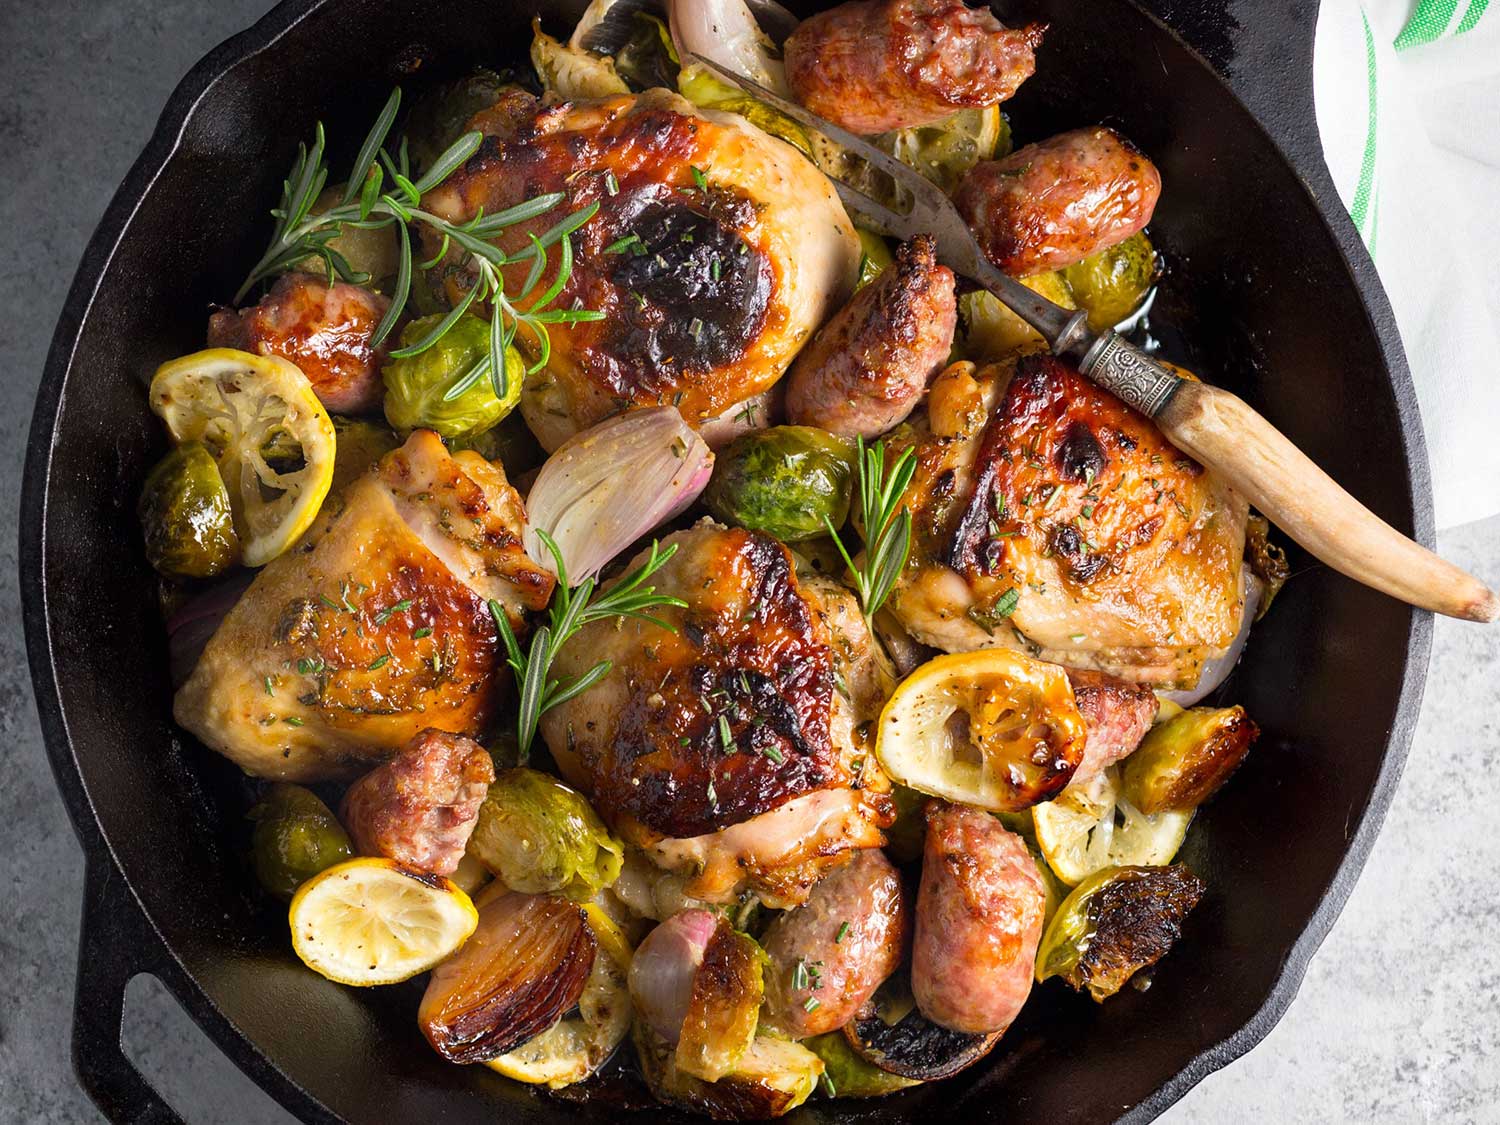
One-Pan Chicken, Sausage, and Brussels Sprouts Recipe


Who wants to juggle three pans on the stove for a hearty fall or winter evening meal? This crispy chicken and sausage dish bakes in a single skillet on a bed of Brussels sprouts until everything is deeply browned and delicious. A rub for the chicken, made from mustard, honey, and rosemary, adds even more layers of flavor.

WHY IT WORKS
The juices from the chicken and sausages coat the sprouts and shallots, giving them incredible flavor.
Everything cooks in one pan for minimal cleanup.

The sprouts crisp on the bottom of the pan and the chicken skin crisps on top for double the crispy texture.

SPECIAL EQUIPMENT:

Rimmed baking sheet or 12-inch cast iron skillet, instant-read thermometer

INGREDIENTS
1 pound (450g) Brussels sprouts, trimmed and halved (or quartered if very large)
5 shallots, peeled and quartered
1 lemon, thinly sliced into rounds, seeds discarded
3 tablespoons (45ml) extra-virgin olive oil, divided
3/4 teaspoon kosher salt, divided
1/2 teaspoon freshly ground black pepper, divided
3 medium cloves garlic, minced or grated
1 1/2 tablespoons (20ml) Dijon mustard
1 1/2 tablespoons (20ml) honey
1 tablespoon (15ml) Worcestershire sauce
3 teaspoons chopped fresh rosemary needles (from about 5 sprigs)
4 bone-in, skin-on chicken thighs (about 1 1/2 pounds; 680g)
4 large Italian sausages, hot or sweet, cut into 2-inch lengths

DIRECTIONS
1.
Position rack in lower third of oven and preheat to 450°F (232°C).
2.
Combine Brussels sprouts, shallots, and lemon with 2 tablespoons (30ml) oil and 1/4 teaspoon each salt and pepper in a 12-inch cast iron skillet. (Alternatively, you can use a rimmed baking sheet.)
3.
In a small bowl, combine garlic, mustard, honey, Worcestershire sauce, rosemary, and remaining 1 tablespoon (15ml) oil, 1/2 teaspoon salt, and 1/4 teaspoon pepper, stirring to form a paste. Rub paste all over chicken. Nestle chicken and sausage pieces on top of Brussels sprouts.

4.

Roast on lower rack until Brussels sprouts are browned and tender and an instant-read thermometer inserted into thickest part of chicken without touching bone registers 165°F (74°C), 25 to 30 minutes. (If chicken and sausage are done before sprouts have browned enough, you can transfer the meat to a plate and let the vegetables finish in the oven; recombine before serving.) Serve.
Read More

Chicken Marsala With Mushrooms and Shallots Recipe

Quick and easy, this chicken Marsala is packed with flavor, thanks to Marsala wine, sautéed mushrooms, shallots, and garlic. The secret to success with this version is to slip extra gelatin into the chicken stock—which helps give the sauce a glaze-like consistency that's just like the best restaurant pan sauces—along with a few other small tricks (hello, soy sauce!).


WHY IT WORKS
Lightly dredging the chicken in flour helps it brown quickly, prevents it from overcooking, and also gives it a silky, velvety texture.
Unflavored gelatin adds a restaurant-quality viscosity to the sauce, making it rich and glaze-like.

Soy sauce rounds out the savory flavor of the sauce and underscores the mushrooms perfectly.

SPECIAL EQUIPMENT:
Large skillet

NOTES:
Good, drinkable-quality Marsala wine can be found for very cheap, so please try to avoid Marsala "cooking" wine (which has added salt and preservatives and doesn't taste nearly as good), if at all possible.

INGREDIENTS
1 1/4 cups (300ml) Marsala wine (see note above)
3/4 cup (180ml) homemade chicken stock or low-sodium store-bought broth
1 packet unflavored gelatin (2 1/2 teaspoons; 10g)
4 boneless, skinless chicken cutlets, each pounded about 1/2 to 1/4 inch thick (1 3/4 pounds; 780g total)
Kosher salt and freshly ground black pepper
About 1 cup all-purpose flour (5 ounces; 140g), for dredging
1/4 cup (60ml) extra-virgin olive oil, plus more if needed
10 ounces (280g) cremini mushrooms, stemmed and thinly sliced
4 medium shallots (6 ounces; 165g), minced
2 medium cloves garlic, minced
1 teaspoon (about 3g) minced fresh thyme leaves
3 tablespoons (45g) cold unsalted butter, cut into cubes
1 teaspoon (5ml) soy sauce
White wine vinegar, sherry vinegar, or fresh lemon juice, to taste
Minced fresh parsley, for garnish

DIRECTIONS
1.
Combine Marsala and stock in a mixing bowl or large measuring cup and sprinkle gelatin all over surface. Set aside.

2.
Season chicken cutlets all over with salt and pepper. Pour a roughly 1/2-inch layer of flour into a wide, shallow bowl. Dredge each cutlet in flour, tap off excess, and transfer to clean plate.

3.
Heat olive oil in a large skillet over medium-high heat until shimmering. Working in batches if necessary, add chicken and cook, turning once, until browned on both sides, about 3 minutes per side. Using a slotted spatula, transfer to paper towels to drain.

4.
Add mushrooms to skillet (do not drain remaining oil) and cook, stirring frequently, until mushrooms have released their juices and browned well, about 10 minutes. Add shallots, garlic, and thyme and cook, stirring, until shallots are translucent, about 2 minutes. Add more oil if pan seems too dry at any point.

5.
Pour Marsala mixture into pan, making sure to scrape in all the gelatin. Bring to a boil, whisking and scraping up any browned bits from bottom of pan, until liquids are reduced by about three-quarters. Add butter and soy sauce and whisk constantly until emulsified and sauce takes on the consistency of heavy cream. Season with salt and pepper. Taste sauce and adjust with a small amount of vinegar or lemon juice, as needed.

6.

Return chicken cutlets to pan, swirling to bathe them in the sauce and warm them through. If the sauce begins to break at any point, swirl in a splash of water to bring it back together. Transfer to a warmed serving plate, spooning sauce all over chicken. Garnish with parsley and serve.
source : seriouseats
Read More